8/20/13

PROJECT #23: WOVEN TANK TOP

© 2015 Runway Sewing. All Rights Reserved.


Here is a draping project that is as easy as it looks to make! You can use any type of woven fabric. Here, I am using a lightweight airy cotton gauze fabric with a natural color twill tape.


Material:
-3/4 yard (longer if you want the top to have more length)
-2 1/2 yards of twill tape


Here are step by step instructions on how to drape a woven tank top to custom fit you perfectly.
Note, if you don't have a custom fit form, you can just measure on your body!


Finish the tank top by hemming the bottom by self folding and top stitching using the sewing machine.
Enjoy your new top!


7/30/13

PROJECT #22: THE HALTER DRESS. DRAPE IT!

© 2013 Runway Sewing. All Rights Reserved.


It's summer and you need a beach dress. Here is an easy halter dress you can drape and make in less than 3 hours! You will need to find a knit fabric that has spandex in it. I used a knit fabric with a tie dye print. I draped this dress fabric directly on the form so I can save a lot of time. You will see below how easy it was for me to make it!

Material:
- 1 1/4 yard (if you want longer add more yardage) 60" wide knit fabric with spandex
- 1/4" Elastic


FRONT VIEW


SIDE VIEW


BACK VIEW


Here are step by step instructions for you to follow.


*I padded my form so it is customized to my measurements.  

A. Cut the fabric in 1/2 at center for the front and back panel. Each panel will equals 30" wide. 
Fold the top 8" so the chest will be lined. Fold the fabric (wrong side) in half and mark the CF with a pin. Pin the fabric with the CF aligned with center of the form. You will be draping only one side.


B. Repeat Step A to the back.
C. Pin the side seam together. I pinned it slightly A line. After pinning, cut along pinning with about 1/2" Seam allowance included. Keep the left over fabric to make drawstring later.
D. Side view after pinning the side seam.
E. Take the fabric off the form and lay it flat. Mark the pinning, with chalk or pen directly onto the fabric. 


F. Unpin the front and back. Smooth out the seam line and add 1 or 2 notches on the seam line and keep about 1/4" to 3/8" seam allowance along seam line.
G. Now, copy to the other side of the body. Fold separately, the front and back on the invisible CENTER line and cut along the seam allowance line.
H. Match up the notches and pin the front and back together along side seams. Sew the side seams together on the sewing machine.


After sewing the garment together at side seams, fold the front and back chest/back facing and put back on the form to seem if the fit and  drape is right.


I. Measure elastic needed. Measure the back top along edge seam to seam and reduce -3.  Back length -3"= Elastic length. Sew a stitch 5/16" away from top edge make a casing for the elastic at back top edge. insert the elastic in the casing sandwiched between the back panel and inside facing panel. Sew/tack the elastic to the side seams to keep in place.

J. Take the left over fabric and cut and sew 2 drawstrings Make the length to your desired length. I made 1/2" wide drawstring. Then cut 1 piece of fabric 1 1/" x 14".  Fold the piece of fabric in the middle so the length equals 7". The fold should be aligned with the top center of the front body opening.

K-L.  Sandwich the ends of the 2 drawstring as L and pin in place.

M-N. Sew the drawstring onto the front garment. Straight stitch a straight line at center of the 2 strings to divide. 

O-P. Pull the drawstrings and make ruching. Tack the ruched fabric to keep the ruching in place.


Here is how the dress looks on the form again.  


7/18/13

REQUEST A PROJECT!!!


Hello all you fashion sewers!

I am taking requests for the next new project!
If you want to know how to make something you have seen on the fashion runway or a magazine etc... email me the picture. I will choose one I think that can be simplified without using a pattern and post the instructions on the blog soon!

Also, if you email me pictures of your creations made from the projects I posted on this blog, I will post up your picture!

Here is my email address --->   runwaysewing@gmail.com

Let me know!
XOXO
Jee

6/19/13

PROJECT #21: "THE MOLINO" BEACH COVER UP

© 2013 Runway Sewing. All Rights Reserved.   


Summer is here! Are you looking for a beach cover up but can't find the perfect one just for your? Make it yourself. It is soo easy! 

If you haven't seen my previous blog post, I added a pdf e-booklet to my website showing you how to make a beach coverup, jacket or dress (depending on how you style it), in an easy to follow step by step instructional booklet. 

You can purchase your pdf (e-booklet) by clicking this link --> The Molino

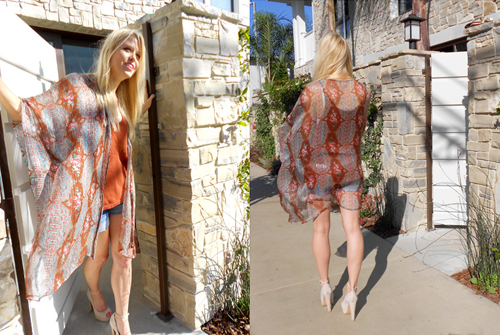
Here are some picture of how "The Molino" can be styled and worn just right for you!


BEACH COVER UP

Made with light weight silk chiffon to be worn as a summer jacket layer or beach coverup.

SILK COVER UP

Same silk chiffon jacket as above, but worn as a jacket layer over shorts for a casual but stylish  look.

SILK CHIFFON DRESS


Same silk chiffon jacket but worn as a dress over a cami slip. Just belt it and it becomes a dress!

SILK BURN OUT JACKET


Using the same pattern, this jacket is made with a silk burnout fabric. It is a luxurious jacket that can by worn over jeans for a casual look or worn over a evening dress for a more formal occasion.

See what you can make with The Molino! 
Good luck and enjoy designing and making whatever you come up with! Thanks for reading!


4/15/13

PROJECT #20 PLEATED NECK SILK TOP

© 2013 Runway Sewing. All Rights Reserved.


Are you looking for a versatile top that is unique and you can wear on any occasion? Here is a lovely comfortable and sexy top you can wear casually over jeans or wear as a fancy top to a party or a special occasion. All you need a a sewing machine and a little bit of your time. Maybe 2 1/2  to 4 hours... depending on your skill level. Whether you are a bigger or long time sewer, you can make this top from scratch and without fussing with a paper pattern. 


This is a high low style top but high in the back and low in the front. It is slightly cropped in the back will show off your sexy back. You can wear a tank underneath if you do not want too much skin exposed, so no worries! In this photo, the model is a size small but this top is a one size top that will fit small to a large.


MooI chose to make this top using a silk habotai fabric. I love the luxurious quality and rich look of silk habotai. Silk take color really well and I love the lightness and the flowy drapiness of the fabric! I think this style will also be soo fabulout as a dress by making it a little longer! So easy!!! Follow the step by step instructions below. Good luck and enjoy!

Material:

-1 1/4 yards of fabric (silk habotai or any light drapey fabric)
-1 yard of 1/4" bias binding (match the color to the fabric)
-Pins


A. Fold the fabric in half.

B. Draw directly on the fabric the neck dimensions as below
-Neck opening width 17"
-Front neck drop from top edge to CF = 5".
-Back neck drop from top edge to CB = 1 1/2".
Draw the front and back neck line with chalk. Cut along marked neck line.

C. Centered at CF neck, fold 5, 1" pleats in 1 direction. Pin them in place as you fold. Centered at CB neck, fold an inverted pleat (1" on each side). Pin the pleats in place. ***Make sure your head can go through the neck before you proceed to D. If you want the neck to be bigger, just make the neck opening wider.

D. Sew a basting stitch (either by hand or sewing machine) around the neckline 1/8" from edge, to keep the pleats in place. Take the pins out as you sew.

E. Use the binding tape to sew along edge of neckline.
E-1. Insert the self fabric in between the bias binding fold and stitch close to the edge all around the opening of the front and back neck line.
E-2.  Turn the sewn bias binding to the inside of the neck. Pin the binding around neck to keep in place. Straight stitch 1/8" along edge of neckline, take out the pins as you sew.

F. Side seam construction: Turn garment inside out. Mark 13" down from top and 3" in from side. Pin first then sew the side seams. Overlock the edge of seam allowance. You can also sew a french seam if you don't want to overlock the seam allowance.

G, H. Armhole and Bottom them construction: Overlock all around the armhole and bottom edge. Fold self fabric to inside of garment at armhole and bottom hem 3/8". Straight stitch 1/4" all around the front and back of armhole and bottom hem.  Press where necessary. Good job, you have completed this project! 


Front and back view of pleated neck silk top. The pleats add fullness to the body of the garment. The back is slightly shorter than the front. I hope you enjoyed making this top.

1/27/13

THE VALENTINE TOP

It's almost Valentines Day again! I am reposting this DIY valentine top in case you haven't made it yet :) Click on the link below to see how you can make this top in just couple of hours!

http://www.runwaysewing.blogspot.com/2011/02/project-7-valentine-top-with-belt.html